博主
专辑
- 跟着禹神学Vue3 1
- Vue3+Element Plus 12
- hutool工具包的使用 13
- 学习笔记zg4 25
- javaweb专辑 2
- gradle专辑 1
- 学习笔记zg2 25
- LeetCode学习 1
- Redisson分布式锁架构 4
- 学习笔记zg6 4
- java面试问题扩充 1
- 消息中间件学习 3
- 学习笔记20230815 11
- Vue3编程专辑 3
- 图片 1
- JVM诊断调优工具Arthas 教程到实战 8
- AOP专辑 3
- ChatGPT问答专辑 4
- kafka 1
- HBase数据库专辑 6
- 第三方接口访问方法 5
- 课堂笔记 1
- 分布式文件存储系统MinIO 5
- Linux运维与安全 4
- Kubernetes专辑 2
- 11 1
- VMWare使用专辑 3
- 线程池 1
- Spring面试 1
- Mycat 2
- Spring 自定义注解与Aop 2
- FFmpeg 1
- ElasticSearch 1
- 面试八股文 5
- mysql 1
- Mybatis 1
- docker 1
- vscode开发vue程序的环境配置 3
- DFA 算法实现的高性能 java 敏感词工具框架sensitive-word 3
- 随心笔记 4
- kafka入门专辑 7
- Websocket专辑 2
- Sentinel专辑 7
- 支付宝支付专辑 3
- Java错误集锦 5
- Web Uploader大文件上传专辑 4
- Mybatis 与 MybatisPlus 专辑 4
- oracle 1
- 达梦数据库 1
- 若依框架专辑 4
- FreeMarker专辑 6
- 电商专辑 1
- 专辑 2
- JAVA十八罗汉 1
- SQL优化专题 6
- MyCat专辑 2
- 简单思考 1
- 学习文档 22
- 腾讯云直播专辑 9
- Skywalking链路追踪 3
- Java面试问题专辑 12
- Java常用工具类专辑 10
- java基础技术及功能 2
- PDF专辑 2
- 网站接入第三方微信扫码登录 3
- Seata分布式事务专辑 2
- Activiti工作流专辑 2
- Linux 1
- Mybatis和MybatisPlus杂记 1
- JMeter专辑 2
- 阿里直播专辑 1
- 面试专辑-数据库篇 1
- 微信登录专辑 1
- MySQL编程指南 3
- Jsoup专辑 6
- MySQL专辑 1
- Apache AB入门 3
- Spring事务专辑 3
- 数据库 1
- 算法 2
- Thymeleaf模版专辑 13
- Java数据加密专辑 4
- Spring框架入门教程 2
- maven专题 6
- JVM专题 9
- 面试专辑高级篇 15
- 面试专辑基础篇 15
- SpringBoot集成Excel的导入导出功能 2
- java设计模式 2
- Apache ECharts使用入门 9
- 分布式框架之zookeeper+dubbo 8
- Java面试专辑 2
- Excel 3
- 微信支付入门 18
- SpringCloud-Alibaba入门专辑 14
- Linux服务器环境配置专辑 8
- SpringCloud-Alibaba 3
- redis葵花宝典 4
- nginx服务器系列 9
- FastDFS专辑 4
- 参码电商平台系统 3
- RabbitMQ由入门到精通 11
- mybatis -plus 7
- IDEA使用技能专辑 10
- MongoDB专辑 6
- Elasticsearch专辑 20
- SSM框架 5
- Redis编程指南 1
- Linux系统常用命令的使用 0
- SpringSecurity安全框架 7
- SpringBoot集成Redis编程 4
- Redis入门专辑 28
- Vue编程专辑 39
- 文件上传到阿里云OSS实战 4
- git源码管理专题 12
- HTTP协议简析 4
- Docker环境搭建专辑 32
- SpringBoot微服务编程专辑 51
- SpringCloud微服务架构 20
- svn源码管理专题 0
- Oracle编程指南 0
- Json编程指南 0
- Spring 实战 0
- 华为高斯(GaussDB)数据库专辑 0
- SpringBoot中的Thymeleaf模板入门 0
- 搭建Window的开发环境 0
- Java语言开发笔记 0
- 微信登录接口专辑 0
第十九节 SpringBoot集成MyBatis
1、简介
(1)是什么Mybatis?
MyBatis 本是apache的一个开源项目iBatis, 2010年这个项目由apache software foundation 迁移到了google code,并且改名为MyBatis 。2013年11月迁移到Github。
iBATIS一词来源于“internet”和“abatis”的组合,是一个基于Java的持久层框架。iBATIS提供的持久层框架包括SQL Maps和Data Access Objects(DAOs)
当前,最新版本是MyBatis 3.5.7 ,其发布时间是2021年4月21日。
MyBatis 是一款优秀的持久层框架,它支持定制化 SQL、存储过程以及高级映射。MyBatis 避免了几乎所有的 JDBC 代码和手动设置参数以及获取结果集。MyBatis 可以使用简单的 XML 或注解来配置和映射原生信息,将接口和 Java 的 POJOs(Plain Ordinary Java Object,普通的 Java对象)映射成数据库中的记录。
(2)官网
2、SpringBoot使用Mybatis
(1)依赖
        <dependency>
            <groupId>mysql</groupId>
            <artifactId>mysql-connector-java</artifactId>
            <scope>runtime</scope>
        </dependency>
        <dependency>
            <groupId>org.mybatis.spring.boot</groupId>
            <artifactId>mybatis-spring-boot-starter</artifactId>
            <version>2.2.0</version>
        </dependency>
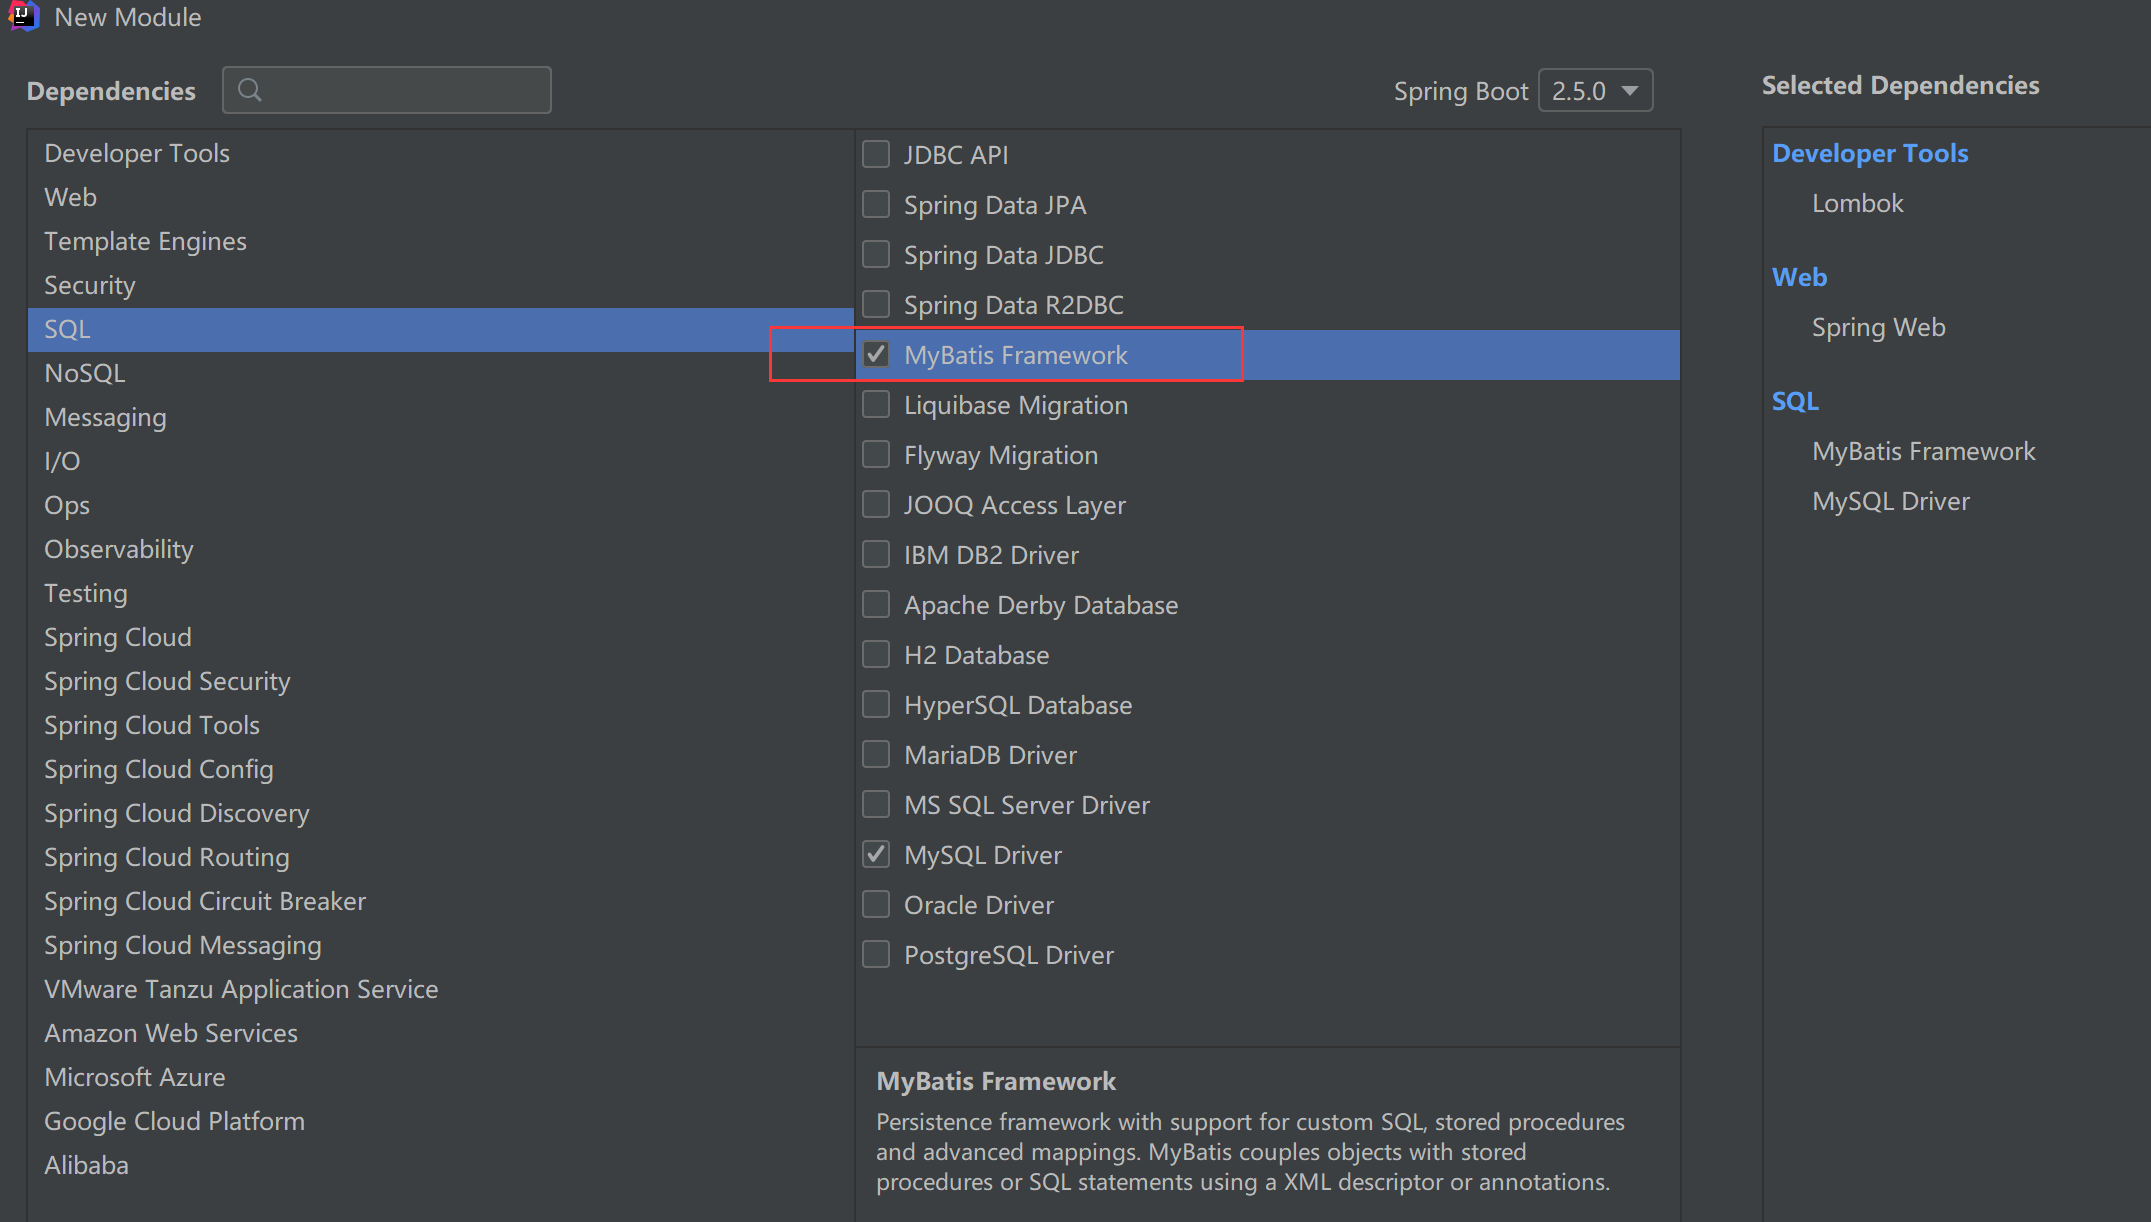
也可以在创建时进行选择,如下:

(2)配置数据相关信息
在application.properties文件中复制下面的配置信息:
spring.application.name=server-mybatis-demo
server.port=8000

## Mybatis
spring.datasource.url=jdbc:mysql://localhost:3306/db_test?autoReconnect=true&useUnicode=true&characterEncoding=utf8&serverTimezone=Asia/Shanghai
spring.datasource.username=root
spring.datasource.password=123456

# 是自动配置别名,也就是设置这个之后,
# 在Mybatis的Mapper文件里就可以写对应的类名,而不用写全路径名了
mybatis.typeAliasesPackage=com.shenmazong.servermybatisdemo.pojo
mybatis.mapperLocations=classpath:/mapper/*.xml
logging.level.com.shenmazong.servermybatisdemo.mapper=debug
mybatis.configuration.map-underscore-to-camel-case=true
使用以上配置,有时候会提示如下错误信息
WARN: This connection is using TLSv1.1 which is now deprecated and will be removed in a future release of Connector/J.

如果出现上面错误,则把连接修改为下面配置即可:
spring.datasource.url=jdbc:mysql://localhost:3306/db_shop_0728?autoReconnect=true&useSSL=false&useUnicode=true&characterEncoding=utf8&serverTimezone=Asia/Shanghai
(3) 建库建表
SET NAMES utf8mb4;
SET FOREIGN_KEY_CHECKS = 0;

-- ----------------------------
-- Table structure for tb_student
-- ----------------------------
DROP TABLE IF EXISTS `tb_student`;
CREATE TABLE `tb_student`  (
  `id` int(11) NOT NULL AUTO_INCREMENT COMMENT '学生ID',
  `student_name` varchar(255) CHARACTER SET utf8 COLLATE utf8_general_ci NULL DEFAULT NULL COMMENT '学生名字',
  `age` int(11) NULL DEFAULT 0 COMMENT '学生年龄',
  PRIMARY KEY (`id`) USING BTREE
) ENGINE = InnoDB AUTO_INCREMENT = 7 CHARACTER SET = utf8 COLLATE = utf8_general_ci ROW_FORMAT = Dynamic;

-- ----------------------------
-- Records of tb_student
-- ----------------------------
INSERT INTO `tb_student` VALUES (1, '吕布', 13);
INSERT INTO `tb_student` VALUES (2, '赵云', 23);
INSERT INTO `tb_student` VALUES (3, '典韦', 25);
INSERT INTO `tb_student` VALUES (4, '黄盖', 35);
INSERT INTO `tb_student` VALUES (5, '马超', 26);
INSERT INTO `tb_student` VALUES (6, '张飞', 33);

SET FOREIGN_KEY_CHECKS = 1;
(4)创建实体类
package com.shenmazong.servermybatisdemo.pojo;

import lombok.Data;

@Data
public class TbStudent {

    private Integer id;
    private String studentName;
    private Integer age;

}
(5)创建mapper
package com.shenmazong.servermybatisdemo.mapper;

import com.shenmazong.servermybatisdemo.pojo.TbStudent;
import org.apache.ibatis.annotations.Mapper;
import org.apache.ibatis.annotations.Param;
import org.apache.ibatis.annotations.Select;

@Mapper
public interface TbStudentMapper {

    @Select("select * from tb_student where id=#{id}")
    TbStudent selectById(@Param("id") Integer id);
}
(6)创建接口
package com.shenmazong.servermybatisdemo.controller;

import com.shenmazong.servermybatisdemo.mapper.TbStudentMapper;
import org.springframework.beans.factory.annotation.Autowired;
import org.springframework.web.bind.annotation.GetMapping;
import org.springframework.web.bind.annotation.RequestParam;
import org.springframework.web.bind.annotation.RestController;

@RestController
public class IndexController {

    @Autowired
    TbStudentMapper tbStudentMapper;

    @GetMapping(value = "/getStudentById")
    public Object getStudentById(@RequestParam("id") Integer id) {
        return tbStudentMapper.selectById(id);
    }
}
3、使用xml配置
(1)创建映射xml文件
<?xml version="1.0" encoding="UTF-8" ?>
<!DOCTYPE mapper
        PUBLIC "-//mybatis.org//DTD Mapper 3.0//EN"
        "http://mybatis.org/dtd/mybatis-3-mapper.dtd">
<mapper namespace="com.shenmazong.servermybatisdemo.mapper.TbStudentMapper">
    <select id="getOneById" resultType="com.shenmazong.servermybatisdemo.pojo.TbStudent">
        select * from tb_student where id=#{id}
    </select>
</mapper>
(2)修改mapper接口
package com.shenmazong.servermybatisdemo.mapper;

import com.shenmazong.servermybatisdemo.pojo.TbStudent;
import org.apache.ibatis.annotations.Mapper;
import org.apache.ibatis.annotations.Param;
import org.apache.ibatis.annotations.Select;

@Mapper
public interface TbStudentMapper {

    @Select("select * from tb_student where id=#{id}")
    TbStudent selectById(@Param("id") Integer id);

    TbStudent getOneById(@Param("id") Integer id);
}
(3)修改接口文件
package com.shenmazong.servermybatisdemo.controller;

import com.shenmazong.servermybatisdemo.mapper.TbStudentMapper;
import org.springframework.beans.factory.annotation.Autowired;
import org.springframework.web.bind.annotation.GetMapping;
import org.springframework.web.bind.annotation.RequestParam;
import org.springframework.web.bind.annotation.RestController;

@RestController
public class IndexController {

    @Autowired
    TbStudentMapper tbStudentMapper;

    @GetMapping(value = "/getStudentById")
    public Object getStudentById(@RequestParam("id") Integer id) {
        return tbStudentMapper.selectById(id);
    }

    @GetMapping(value = "/getOneById")
    public Object getOneById(@RequestParam("id") Integer id) {
        return tbStudentMapper.getOneById(id);
    }
}
需要注意的是,xml文件存放路径已经要和application.properties文件中配置的扫描路径相匹配。
3、获取自增主键ID
上面我们演示了如何使用MyBatis进行查询,但是在实际工作中,我们还有增加和修改,甚至还有删除。在增删改查操作中,没有太特别值得注意的地方,但是对于在增加操作中,如何获得自增主键的ID问题,让很多小伙伴掉到了坑了,那么接下来,我们就演示一下,看看如何获得自增的ID。
(1)映射xml的设置
    <insert id="addStudent"  useGeneratedKeys="true" keyProperty="id" keyColumn="id">
        insert tb_student(id,student_name,age) values(#{id},#{studentName},#{age})
    </insert>
- useGeneratedKeys: 是否自动生成主键,默认false
- keyProperty :返回的主键值赋给哪个属性
- keyColumn: 数据库中的自增主键的列名,默认是数据库表的第一列。当主键列不是表中的第一列的时候需要设置,PostgreSQL必须设置。
主键自动生成,取决于数据库是否支持自增主键。实际上当设置了useGeneratedKeys=“true”,Mybatis会调用JDBC的getGeneratedKeys方法,并将获取的主键值赋值给keyProperty 指定的属性。
完整的xml映射文件如下:
<?xml version="1.0" encoding="UTF-8" ?>
<!DOCTYPE mapper
        PUBLIC "-//mybatis.org//DTD Mapper 3.0//EN"
        "http://mybatis.org/dtd/mybatis-3-mapper.dtd">
<mapper namespace="com.shenmazong.servermybatisdemo.mapper.TbStudentMapper">
    <select id="getOneById" resultType="com.shenmazong.servermybatisdemo.pojo.TbStudent">
        select * from tb_student where id=#{id}
    </select>

    <insert id="addStudent"  useGeneratedKeys="true" keyProperty="id" keyColumn="id">
        insert tb_student(id,student_name,age) values(#{id},#{studentName},#{age})
    </insert>
</mapper>
(2)mapper接口
package com.shenmazong.servermybatisdemo.mapper;

import com.shenmazong.servermybatisdemo.pojo.TbStudent;
import org.apache.ibatis.annotations.Mapper;
import org.apache.ibatis.annotations.Param;
import org.apache.ibatis.annotations.Select;

@Mapper
public interface TbStudentMapper {

    @Select("select * from tb_student where id=#{id}")
    TbStudent selectById(@Param("id") Integer id);

    TbStudent getOneById(@Param("id") Integer id);

    Integer addStudent(TbStudent tbStudent);
}
(3)接口定义
    @GetMapping(value = "/addStudent")
    public Object addStudent(@RequestParam("studentName") String studentName,
                             @RequestParam("age") Integer age) {
        TbStudent tbStudent = new TbStudent();
        tbStudent.setStudentName(studentName);
        tbStudent.setAge(age);
        Integer studentId = tbStudentMapper.addStudent(tbStudent);
        System.out.println("studentId="+studentId);

        return tbStudent;
    }
以上就是SpringBoot集成Mybatis的入门介绍,针对如何实现分页以及如何进行事务控制,会有单独的章节进行介绍。