博主
258
258
258
258
专辑
- 跟着禹神学Vue3 1
- Vue3+Element Plus 12
- hutool工具包的使用 13
- 学习笔记zg4 25
- javaweb专辑 2
- gradle专辑 1
- 学习笔记zg2 25
- LeetCode学习 1
- Redisson分布式锁架构 4
- 学习笔记zg6 4
- java面试问题扩充 1
- 消息中间件学习 3
- 学习笔记20230815 11
- Vue3编程专辑 3
- 图片 1
- JVM诊断调优工具Arthas 教程到实战 8
- AOP专辑 3
- ChatGPT问答专辑 4
- kafka 1
- HBase数据库专辑 6
- 第三方接口访问方法 5
- 课堂笔记 1
- 分布式文件存储系统MinIO 5
- Linux运维与安全 4
- Kubernetes专辑 2
- 11 1
- VMWare使用专辑 3
- 线程池 1
- Spring面试 1
- Mycat 2
- Spring 自定义注解与Aop 2
- FFmpeg 1
- ElasticSearch 1
- 面试八股文 5
- mysql 1
- Mybatis 1
- docker 1
- vscode开发vue程序的环境配置 3
- DFA 算法实现的高性能 java 敏感词工具框架sensitive-word 3
- 随心笔记 4
- kafka入门专辑 7
- Websocket专辑 2
- Sentinel专辑 7
- 支付宝支付专辑 3
- Java错误集锦 5
- Web Uploader大文件上传专辑 4
- Mybatis 与 MybatisPlus 专辑 4
- oracle 1
- 达梦数据库 1
- 若依框架专辑 4
- FreeMarker专辑 6
- 电商专辑 1
- 专辑 2
- JAVA十八罗汉 1
- SQL优化专题 6
- MyCat专辑 2
- 简单思考 1
- 学习文档 22
- 腾讯云直播专辑 9
- Skywalking链路追踪 3
- Java面试问题专辑 12
- Java常用工具类专辑 10
- java基础技术及功能 2
- PDF专辑 2
- 网站接入第三方微信扫码登录 3
- Seata分布式事务专辑 2
- Activiti工作流专辑 2
- Linux 1
- Mybatis和MybatisPlus杂记 1
- JMeter专辑 2
- 阿里直播专辑 1
- 面试专辑-数据库篇 1
- 微信登录专辑 1
- MySQL编程指南 3
- Jsoup专辑 6
- MySQL专辑 1
- Apache AB入门 3
- Spring事务专辑 3
- 数据库 1
- 算法 2
- Thymeleaf模版专辑 13
- Java数据加密专辑 4
- Spring框架入门教程 2
- maven专题 6
- JVM专题 9
- 面试专辑高级篇 15
- 面试专辑基础篇 15
- SpringBoot集成Excel的导入导出功能 2
- java设计模式 2
- Apache ECharts使用入门 9
- 分布式框架之zookeeper+dubbo 8
- Java面试专辑 2
- Excel 3
- 微信支付入门 18
- SpringCloud-Alibaba入门专辑 14
- Linux服务器环境配置专辑 8
- SpringCloud-Alibaba 3
- redis葵花宝典 4
- nginx服务器系列 9
- FastDFS专辑 4
- 参码电商平台系统 3
- RabbitMQ由入门到精通 11
- mybatis -plus 7
- IDEA使用技能专辑 10
- MongoDB专辑 6
- Elasticsearch专辑 20
- SSM框架 5
- Redis编程指南 1
- Linux系统常用命令的使用 0
- SpringSecurity安全框架 7
- SpringBoot集成Redis编程 4
- Redis入门专辑 28
- Vue编程专辑 39
- 文件上传到阿里云OSS实战 4
- git源码管理专题 12
- HTTP协议简析 4
- Docker环境搭建专辑 32
- SpringBoot微服务编程专辑 51
- SpringCloud微服务架构 20
- svn源码管理专题 0
- Oracle编程指南 0
- Json编程指南 0
- Spring 实战 0
- 华为高斯(GaussDB)数据库专辑 0
- SpringBoot中的Thymeleaf模板入门 0
- 搭建Window的开发环境 0
- Java语言开发笔记 0
- 微信登录接口专辑 0
第八节 Vue脚手架之安装axios
亮子
2021-06-09 09:33:10
7213
0
0
0
既然vue是前后端分离的,那么前端和后端的数据交换,就需要一个js库来实现,在这里我们选择的是axios,安装命令如下:
npm install axios --save
安装完成后,要想使用axios库,也需要在main.js文件中增加如下配置代码:
// file:main.js
import Vue from 'vue'
import ElementUI from 'element-ui'
import 'element-ui/lib/theme-chalk/index.css'
//--1
import axios from 'axios'
import App from './App.vue'

//--2
axios.defaults.baseURL="http://localhost:8080";
Vue.prototype.$http = axios

Vue.use(ElementUI)

new Vue({
  el: '#app',
  render: h => h(App)
})
axios的请求可以使用下面的范例:
- 异步模式:
    axios
      .get('https://api.coindesk.com/v1/bpi/currentprice.json')
      .then(response => {
        this.info = response.data.bpi
      })
      .catch(error => {
        console.log(error)
        this.errored = true
      })
      .finally(() => this.loading = false)
- 同步模式:
//使用 asyns/await
async getHistoryData (data) {
 try {
   let res = await axios.get('/api/survey/list/', {
     params: data
   })
   this.tableData = res.data.result
   this.totalData = res.data.count
 } catch (err) {
   console.log(err)
   alert('请求出错!')
 }
}
执行 GET 请求
// 为给定 ID 的 user 创建请求
axios.get('/user?ID=12345')
  .then(function (response) {
    console.log(response);
  })
  .catch(function (error) {
    console.log(error);
  });

// 上面的请求也可以这样做
axios.get('/user', {
    params: {
      ID: 12345
    }
  })
  .then(function (response) {
    console.log(response);
  })
  .catch(function (error) {
    console.log(error);
  });
执行 POST 请求
axios.post('/user', {
    firstName: 'Fred',
    lastName: 'Flintstone'
  })
  .then(function (response) {
    console.log(response);
  })
  .catch(function (error) {
    console.log(error);
  });
axios拦截器
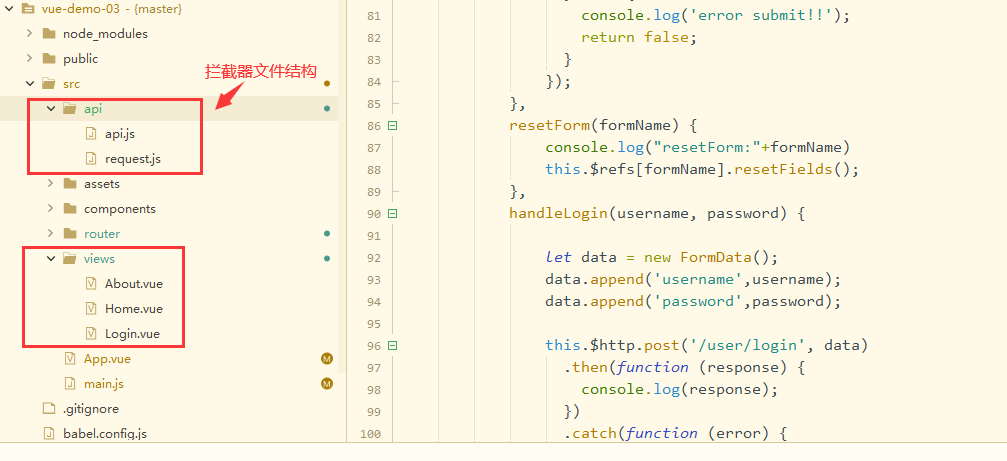
1、目录结构

2、api/request.js文件
import axios from "axios"

// 创建axios实例
const service = axios.create({
    baseURL: 'http://localhost:8000',  // api的base_url
    timeout: 5000  // 请求超时时间
})

// 拦截请求
service.interceptors.request.use(
    config => {
        console.log("request url="+config.url)
        // config.baseURL = '/user/'
        // config.withCredentials = true // 允许携带token ,这个是解决跨域产生的相关问题
        config.timeout = 6000
        let token = sessionStorage.getItem('token')
        if (token) {
            config.headers.Authorization = token;
            config.headers = {
                'token': token,
                // 'Content-Type': 'application/x-www-form-urlencoded'
            }
        }
        return config
    },
    error => {
        return Promise.reject(error)
    }
)

// 拦截响应
service.interceptors.response.use(
    response => {
        // 定时刷新token
        console.log(response.data)
        return response
    },
    error => {
        return Promise.reject(error)
    }
)

export default service
3、api/api.js文件
import service from './request'

export const login = data => {
    return service({
        url: '/user/login',
        method: 'post',
        data
    })
};
4、api/api.js文件的使用
    import {login} from '../api/api.js'


        methods: {
            submitForm(formName) {
                //
                this.$refs[formName].validate((valid) => {
                  if (valid) {
                    // 进行登录
                    let data = new FormData()
                    data.append('username',this.ruleForm.username)
                    data.append('password',this.ruleForm.password)
                    login(data)
                    .then(res => {
                        console.log(res)
                        this.$router.push("/")
                    })
                    .catch(err => {
                        console.log(err)
                    })
                    //this.handleLogin(this.ruleForm.username, this.ruleForm.password)P
                  } else {
                    console.log('error submit!!');
                    return false;
                  }
                });
            }
        }
5、同步调用
//index.vue
import {login} from '../api/api.js'
export default {
    created: async function () {
        const params = {
            card_no: '111'
        };
        let res = await login(params);
        console.log(res);
    }
}