博主
专辑
- 跟着禹神学Vue3 1
- Vue3+Element Plus 12
- hutool工具包的使用 13
- 学习笔记zg4 24
- javaweb专辑 2
- gradle专辑 1
- 学习笔记zg2 25
- LeetCode学习 1
- Redisson分布式锁架构 4
- 学习笔记zg6 4
- java面试问题扩充 1
- 消息中间件学习 3
- 学习笔记20230815 11
- Vue3编程专辑 3
- 图片 1
- JVM诊断调优工具Arthas 教程到实战 8
- AOP专辑 3
- ChatGPT问答专辑 4
- kafka 1
- HBase数据库专辑 6
- 第三方接口访问方法 5
- 课堂笔记 1
- 分布式文件存储系统MinIO 5
- Linux运维与安全 4
- Kubernetes专辑 2
- 11 1
- VMWare使用专辑 3
- 线程池 1
- Spring面试 1
- Mycat 2
- Spring 自定义注解与Aop 2
- FFmpeg 1
- ElasticSearch 1
- 面试八股文 5
- mysql 1
- Mybatis 1
- docker 1
- vscode开发vue程序的环境配置 3
- DFA 算法实现的高性能 java 敏感词工具框架sensitive-word 3
- 随心笔记 4
- kafka入门专辑 7
- Websocket专辑 2
- Sentinel专辑 7
- 支付宝支付专辑 3
- Java错误集锦 5
- Web Uploader大文件上传专辑 4
- Mybatis 与 MybatisPlus 专辑 4
- oracle 1
- 达梦数据库 1
- 若依框架专辑 4
- FreeMarker专辑 6
- 电商专辑 1
- 专辑 2
- JAVA十八罗汉 1
- SQL优化专题 6
- MyCat专辑 2
- 简单思考 1
- 学习文档 22
- 腾讯云直播专辑 9
- Skywalking链路追踪 3
- Java面试问题专辑 12
- Java常用工具类专辑 10
- java基础技术及功能 2
- PDF专辑 2
- 网站接入第三方微信扫码登录 3
- Seata分布式事务专辑 2
- Activiti工作流专辑 2
- Linux 1
- Mybatis和MybatisPlus杂记 1
- JMeter专辑 2
- 阿里直播专辑 1
- 面试专辑-数据库篇 1
- 微信登录专辑 1
- MySQL编程指南 3
- Jsoup专辑 6
- MySQL专辑 1
- Apache AB入门 3
- Spring事务专辑 3
- 数据库 1
- 算法 2
- Thymeleaf模版专辑 13
- Java数据加密专辑 4
- Spring框架入门教程 2
- maven专题 6
- JVM专题 9
- 面试专辑高级篇 15
- 面试专辑基础篇 15
- SpringBoot集成Excel的导入导出功能 2
- java设计模式 2
- Apache ECharts使用入门 9
- 分布式框架之zookeeper+dubbo 8
- Java面试专辑 2
- Excel 3
- 微信支付入门 18
- SpringCloud-Alibaba入门专辑 14
- Linux服务器环境配置专辑 8
- SpringCloud-Alibaba 3
- redis葵花宝典 4
- nginx服务器系列 9
- FastDFS专辑 4
- 参码电商平台系统 3
- RabbitMQ由入门到精通 11
- mybatis -plus 7
- IDEA使用技能专辑 10
- MongoDB专辑 6
- Elasticsearch专辑 20
- SSM框架 5
- Redis编程指南 1
- Linux系统常用命令的使用 0
- SpringSecurity安全框架 7
- SpringBoot集成Redis编程 4
- Redis入门专辑 28
- Vue编程专辑 39
- 文件上传到阿里云OSS实战 4
- git源码管理专题 12
- HTTP协议简析 4
- Docker环境搭建专辑 32
- SpringBoot微服务编程专辑 51
- SpringCloud微服务架构 20
- svn源码管理专题 0
- Oracle编程指南 0
- Json编程指南 0
- Spring 实战 0
- 华为高斯(GaussDB)数据库专辑 0
- SpringBoot中的Thymeleaf模板入门 0
- 搭建Window的开发环境 0
- Java语言开发笔记 0
- 微信登录接口专辑 0
第三十节 springboot整合knife4j实现接口文档
1、关于knife4j
Knife4j的前身是swagger-bootstrap-ui,前身swagger-bootstrap-ui是一个纯swagger-ui的ui皮肤项目
一开始项目初衷是为了写一个增强版本的swagger的前端ui,但是随着项目的发展,面对越来越多的个性化需求,不得不编写后端Java代码以满足新的需求,在swagger-bootstrap-ui的1.8.5~1.9.6版本之间,采用的是后端Java代码和Ui都混合在一个Jar包里面的方式提供给开发者使用.这种方式虽说对于集成swagger来说很方便,只需要引入jar包即可,但是在微服务架构下显得有些臃肿。
因此,项目正式更名为knife4j,取名knife4j是希望她能像一把匕首一样小巧,轻量,并且功能强悍,更名也是希望把她做成一个为Swagger接口文档服务的通用性解决方案,不仅仅只是专注于前端Ui前端.
swagger-bootstrap-ui的所有特性都会集中在knife4j-spring-ui包中,并且后续也会满足开发者更多的个性化需求.
主要的变化是,项目的相关类包路径更换为
com.github.xiaoymin.knife4j前缀,开发者使用增强注解时需要替换包路径
后端Java代码和ui包分离为多个模块的jar包,以面对在目前微服务架构下,更加方便的使用增强文档注解(使用SpringCloud微服务项目,只需要在网关层集成UI的jar包即可,因此分离前后端)
knife4j沿用swagger-bootstrap-ui的版本号,第1个版本从1.9.6开始,关于使用方法,请参考文档(摘自 knife4j 官方介绍)。
2、引入knife4j
knife4j 主要的版本基本如下所示
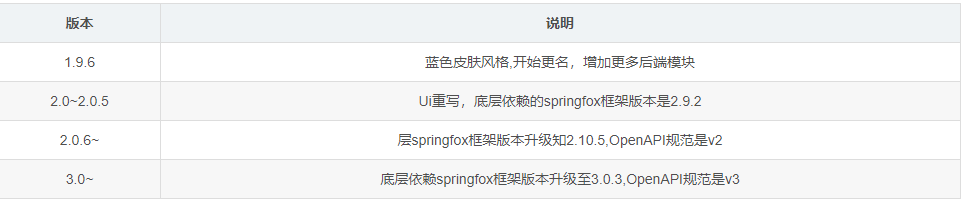
我们引入的是3.0.3,由于3.x只发布了一个版本,稳定性可能存在一定的问题,如果你想最求稳定,那么推荐你使用 2.x,由于我这里只是demo展示,加上我自己喜欢新版本,所以我这里使用了3.0.3,提前帮大家猜猜坑。
<dependency>
    <groupId>com.github.xiaoymin</groupId>
    <artifactId>knife4j-spring-boot-starter</artifactId>
    <version>3.0.3</version>
</dependency>
注意
knife4j 已经引入了 springfox,所以在使用的时候无需再次引入springfox,否则有可能会导致版本冲突,如果你在网关聚合时,必须禁用 knife4j 的增强功能。
使用Knife4j2.0.6及以上的版本,Spring Boot的版本必须大于等于2.2.x
3、创建配置类
package com.shenmazong.config;

import org.springframework.context.annotation.Bean;
import org.springframework.context.annotation.Configuration;
import springfox.documentation.builders.ApiInfoBuilder;
import springfox.documentation.builders.PathSelectors;
import springfox.documentation.builders.RequestHandlerSelectors;
import springfox.documentation.service.Contact;
import springfox.documentation.spi.DocumentationType;
import springfox.documentation.spring.web.plugins.Docket;
import springfox.documentation.swagger2.annotations.EnableSwagger2;

/**
 * @author 军哥
 * @version 1.0
 * @description: Knife4j 配置类
 * @date 2022/5/26 9:56
 */

@Configuration
@EnableSwagger2
public class Knife4jConfiguration {
    @Bean(value = "defaultApi2")
    public Docket defaultApi2() {
        String groupName="3.X版本";
        Docket docket=new Docket(DocumentationType.OAS_30)
                .apiInfo(new ApiInfoBuilder()
                        .title("这是knife4j API ")
                        .description("# 这里记录服务端所有的接口的入参,出参等等信息")
                        .termsOfServiceUrl("https://www.shenmazong.com")
                        .contact(new Contact("亮子说编程","https://www.shenmazong.com","3350996729@qq.com"))
                        .version("3.0")
                        .build())
                //分组名称
                .groupName(groupName)
                .select()
                //这里指定Controller扫描包路径
                .apis(RequestHandlerSelectors.basePackage("com.shenmazong.controller"))
                .paths(PathSelectors.any())
                .build();
        return docket;
    }
}
这里需要注意一点,如果你使用的是 2.x,那么需要将 @EnableSwagger2 替换成 @EnableSwagger2WebMvc, 因为 @EnableSwagger2 是在 3.x 才引入的注解,并且将@EnableSwagger2WebMvc 设置为不推荐使用。
4、创建测试接口
package com.shenmazong.controller;

import io.swagger.annotations.Api;
import io.swagger.annotations.ApiImplicitParam;
import io.swagger.annotations.ApiOperation;
import org.springframework.web.bind.annotation.PostMapping;
import org.springframework.web.bind.annotation.RequestMapping;
import org.springframework.web.bind.annotation.RequestParam;
import org.springframework.web.bind.annotation.RestController;

/**
 * @author 军哥
 * @version 1.0
 * @description: 测试接口
 * @date 2022/5/26 10:49
 */

@RestController
@RequestMapping(value = "/hello")
@Api(tags = "测试swagger")
public class HelloController {


    @PostMapping(value = "/sayHello")
    @ApiImplicitParam(name = "name",value = "姓名",required = true)
    @ApiOperation("打招呼")
    public String sayHello(@RequestParam("name") String name) {
        return "hello:" + name;
    }
}
5、查看接口文档
接口默认文档路径如下:
http://localhost:8080/doc.html

6、启动报错
如果你在启动项目的时候抛出:Failed to start bean ‘
documentationPluginsBootstrapper’; nested exception is java.lang.NullPointerException
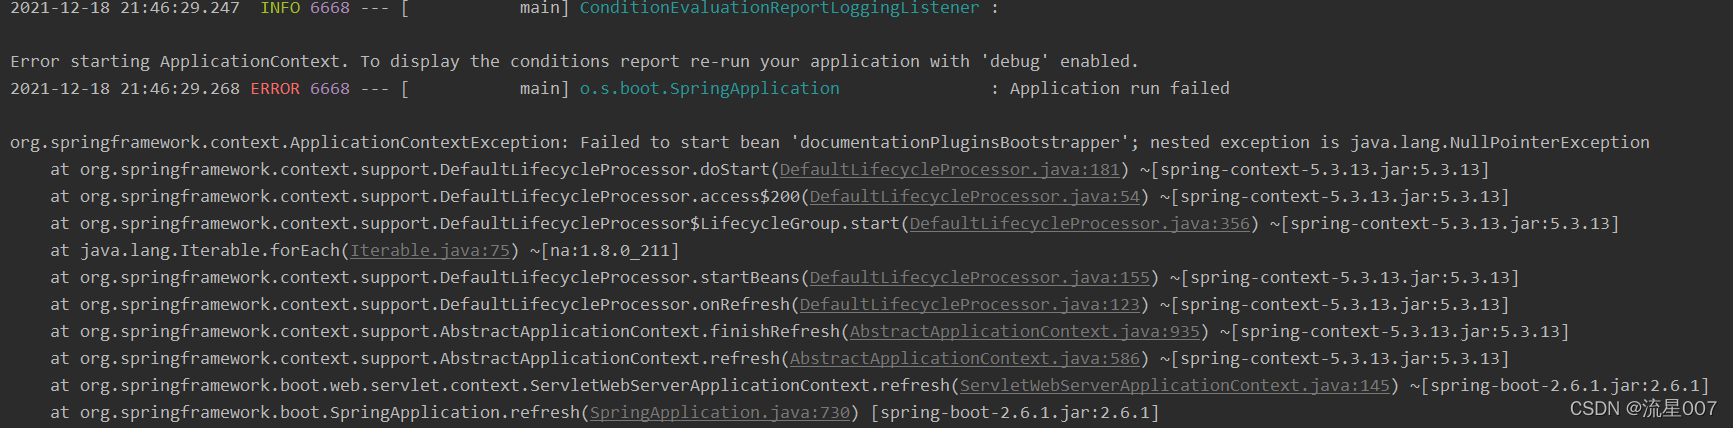
千万不要慌,那是因为你的 springboot 版本太高,应该是 2.6.x,由于Springfox使用的路径匹配是基于AntPathMatcher,而Spring Boot 2.6.X使用的是PathPatternMatcher,所以将MVC的路径匹配规则改成 AntPathMatcher,在配置文件中加入如下参数即可(如果没有报错,可以跳过这个环节)
spring:
  mvc:
    pathmatch:
      # Springfox使用的路径匹配是基于AntPathMatcher的,而Spring Boot 2.6.X使用的是PathPatternMatcher
      # 所以需要配置此参数
      matching-strategy: ant_path_matcher
启动成功之后,在浏览器中访问:
http://127.0.0.1:8080/doc.html(ip+端口+/doc.html)。