博主
专辑
- 跟着禹神学Vue3 1
- 学习笔记zg2(SpringBoot版) 10
- 学习笔记zg2-马 0
- LayUI专辑 14
- 学习笔记zg1 9
- java基础 1
- Alibaba Cloud Linux 环境搭建 3
- Cherry Markdown Editor 1
- 面试题 0
- 学习笔记zg5 10
第十一节 RabbitMQ-五种工作模式的使用(rountingKey、exchange的使用)
第07单元-RabbitMQ-02-五种工作模式的使用
项目需求:
系统平台发送不同类型的消息,比如用户关注消息、用户点赞消息、用户转发消息。
需求描述:
用户如果关注某个用户,需要给被关注的用户发送提醒消息。用户点赞另一个用户的消息,需要给被点赞用户发送提醒消息,以此类推,系统需要发送不同类型的消息,需要使用不同的队列的来传输消息,以及保存到不同的记录表中。
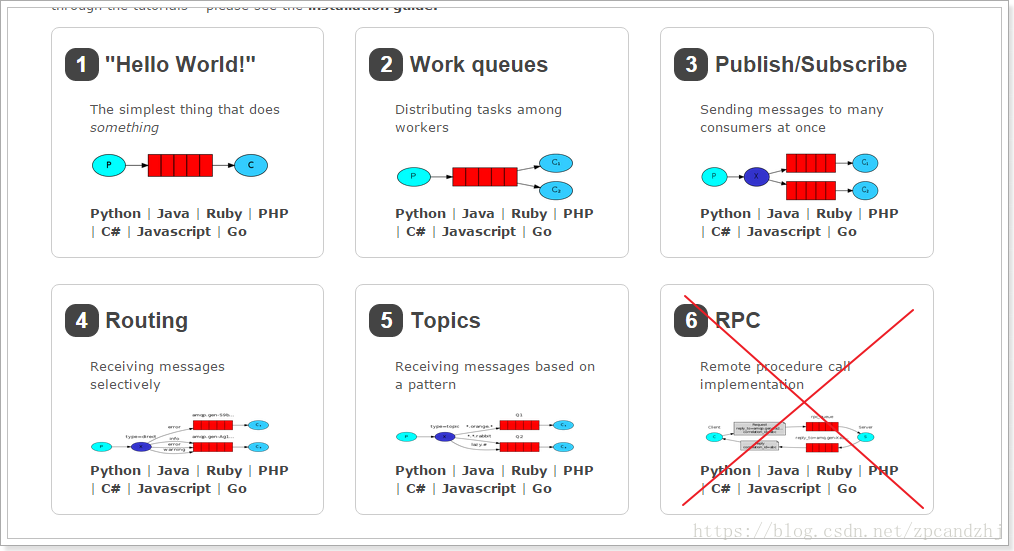
1、工作模式

(1)简单模式(sample)

(2)工作模式(work)

(3)订阅模式(fanout)

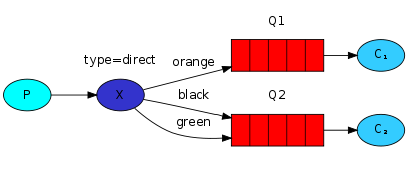
(4)路由模式(direct)

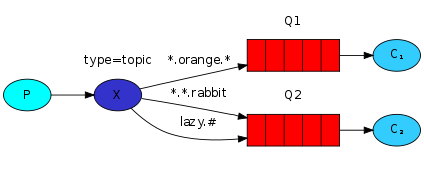
(5)主题模式(topic)

2、为什么要选择 RabbitMQ
1)、RabbitMQ 是实现了 AMQP 标准的消息服务器;
2)、可靠性:RabbitMQ 的持久化支持,保证了消息的稳定性;
3)、高并发:RabbitMQ 使用了 Erlang 开发语言,Erlang 是为电话交换机开发的语言,天生自带高并发光环,和高可用特性;
4)、集群部署简单,正是应为 Erlang 使得 RabbitMQ 集群部署变的超级简单;
5)、社区活跃度高,根据网上资料来看,RabbitMQ 也是首选;
3、使用场景
1)应用解耦(异步处理)
上游系统处理完成之后,把数据消息写入消息队列中,业务逻辑完成;下游系统可以订阅消息队列,也可以自由的从消息队列拉取消息。上下游毫不关联。
2)同步调用
能够拿到下游系统异步处理的结果。
3)顺序调度
先进先出原则去调度有严格先后顺序的任务。
4) 通知分发
指消息多方分发,例如订单系统的下单消息几乎要分发给所有的其他系统,主要利用 Exchange 的 fanout 类型。
5)高并发缓存
我们可以把所有的请求全部存入到队列(队列的存储能力理论上无限的,主要受制于空间),然后再批量取出能处理数量的消息处理(主要利用消息队列作为消息存储容器的特性)。
6)并发限流
高并发的情况下,只接受指定数量的请求,队列满了就直接拒绝(主要利用消息队列的设置队列长度特性)。
7)延迟任务调度
为消息设置等同延时的有效期,消息过期后进入到死信队列,然后再到死信队列取消息处理。
4、RabbitMQ 工作机制
RabbitMQ 实现了AMQP 0-9-1 标准。作为中间件协议,AMQP(高级消息队列协议)是一个用于在分布式系统中存储转发消息进行通信网络协议。

在上面的使用场景分析中我们可以看出来,消息中间件(brokers)主要承担一个消息(message)容器的角色,它接收从发布者(publishers)亦称生产者(producers)那儿来的消息,并根据既定的路由规则,把接收到的消息发送给处理消息的消费者(consumers)处理——实际上 RabbitMQ 是生产者(producers)投递到交换机(exchange),exchange 按照路由规则分发到特定的队列(queue),再推送给消费者(consumers),或者消费者(consumers)主动拉取。

示意图中所示,消息由 “生产者”(producer / publisher)通过 “消息代理”(broker)传递到 “消费者”(consumer),具体而言:
1、消息由 “生产者” 发布到 “交换器”(exchange);
2、“交换器” 根据 “绑定”(binding),将消息路由(分发)到队列(queue);
3、“消费者” 获取 “队列” 中的消息。
4、AMQP 中,“队列”、“交换器”、“绑定”,被称为 “实体”(entity)。
5、“消息确认” :允许 “消费者” 收到消息时,通知 “消息代理”,此时,消息将被 “消息代理” 从 “队列” 中移除。
5、简单模式
以下是一个简单的 RabbitMQ 简单工作模式(Work Queues)的示例代码,其中包括生产者和消费者的实现:
- 生产者 Producer:
import org.springframework.amqp.rabbit.core.RabbitTemplate;
import org.springframework.beans.factory.annotation.Autowired;
import org.springframework.stereotype.Component;

@Component
public class Producer {

    @Autowired
    private RabbitTemplate rabbitTemplate;

    private static final String QUEUE_NAME = "work-queue";

    public void sendMessage(String message) {
        rabbitTemplate.convertAndSend(QUEUE_NAME, message);
        System.out.println("Sent: " + message);
    }
}
- 消费者 Consumer:
import org.springframework.amqp.rabbit.annotation.RabbitListener;
import org.springframework.stereotype.Component;

@Component
public class Consumer {

    @RabbitListener(queues = "work-queue")
    public void receiveMessage(String message) {
        System.out.println("Received: " + message);
    }
}
- RabbitMQ 配置类:
import org.springframework.amqp.core.Queue;
import org.springframework.context.annotation.Bean;
import org.springframework.context.annotation.Configuration;

@Configuration
public class RabbitConfig {

    private static final String QUEUE_NAME = "work-queue";

    @Bean
    public Queue queue() {
        return new Queue(QUEUE_NAME, false);
    }
}
在这个简单的示例中,生产者通过 Producer 类发送消息到名为 "work-queue" 的队列,消费者通过 Consumer 类监听同一个队列来接收消息。
确保 RabbitMQ 已经正确配置并运行,Spring Boot 应用程序将自动创建名为 "work-queue" 的队列,并且生产者可以向该队列发送消息,消费者可以从该队列接收消息。
注意:以上示例代码使用了 Spring Boot 和 Spring AMQP(RabbitMQ 的 Java客户端),请确保项目中已经引入相关的依赖。
6、工作模式
以下是一个在 Spring Boot 项目中实现 RabbitMQ 简单工作模式(Work Queues)的示例代码,包括生产者和消费者的实现:
- 添加依赖:
在 pom.xml 文件中添加以下依赖:
<dependencies>
    <!-- RabbitMQ 客户端依赖 -->
    <dependency>
        <groupId>org.springframework.boot</groupId>
        <artifactId>spring-boot-starter-amqp</artifactId>
    </dependency>
</dependencies>
- 配置 RabbitMQ 连接:
在 application.properties 文件中添加 RabbitMQ 的连接配置:
spring.rabbitmq.host=localhost
spring.rabbitmq.port=5672
spring.rabbitmq.username=guest
spring.rabbitmq.password=guest
- 生产者 Producer:
import org.springframework.amqp.core.Queue;
import org.springframework.amqp.rabbit.core.RabbitTemplate;
import org.springframework.beans.factory.annotation.Autowired;
import org.springframework.boot.CommandLineRunner;
import org.springframework.boot.SpringApplication;
import org.springframework.boot.autoconfigure.SpringBootApplication;
import org.springframework.context.annotation.Bean;

@SpringBootApplication
public class Producer implements CommandLineRunner {

    @Autowired
    private RabbitTemplate rabbitTemplate;

    @Bean
    public Queue queue() {
        return new Queue("work-queue");
    }

    public static void main(String[] args) {
        SpringApplication.run(Producer.class, args);
    }

    @Override
    public void run(String... args) throws Exception {
        String message = "Hello, RabbitMQ Work Queue!";
        rabbitTemplate.convertAndSend("work-queue", message);
        System.out.println("Sent: " + message);
    }
}
- 消费者 Consumer:
import org.springframework.amqp.rabbit.annotation.RabbitListener;
import org.springframework.boot.SpringApplication;
import org.springframework.boot.autoconfigure.SpringBootApplication;

@SpringBootApplication
public class Consumer {

    public static void main(String[] args) {
        SpringApplication.run(Consumer.class, args);
    }

    @RabbitListener(queues = "work-queue")
    public void receiveMessage(String message) {
        System.out.println("Received: " + message);
    }
}
在这个简单的示例中,生产者通过 rabbitTemplate 向名为 "work-queue" 的队列发送消息。消费者使用 @RabbitListener 注解监听同一个队列,并在接收到消息时输出到控制台。
确保 RabbitMQ 已经正确安装和运行,运行生产者和消费者的 Spring Boot 应用程序后,生产者会发送消息到队列,消费者会接收并打印消息。
注意:以上示例代码使用了 Spring Boot 和 Spring AMQP(RabbitMQ 的 Java客户端),请确保项目中已经引入相关的依赖。
7、发布订阅模式
以下是一个在 Spring Boot 项目中实现 RabbitMQ 简单的 Fanout Exchange 模式的示例代码,包括生产者和消费者的实现:
- 添加依赖:
在 pom.xml 文件中添加以下依赖:
<dependencies>
    <!-- RabbitMQ 客户端依赖 -->
    <dependency>
        <groupId>org.springframework.boot</groupId>
        <artifactId>spring-boot-starter-amqp</artifactId>
    </dependency>
</dependencies>
- 配置 RabbitMQ 连接:
在 application.properties 文件中添加 RabbitMQ 的连接配置:
spring.rabbitmq.host=localhost
spring.rabbitmq.port=5672
spring.rabbitmq.username=guest
spring.rabbitmq.password=guest
- 生产者 Producer:
import org.springframework.amqp.core.FanoutExchange;
import org.springframework.amqp.rabbit.core.RabbitTemplate;
import org.springframework.beans.factory.annotation.Autowired;
import org.springframework.boot.CommandLineRunner;
import org.springframework.boot.SpringApplication;
import org.springframework.boot.autoconfigure.SpringBootApplication;
import org.springframework.context.annotation.Bean;

@SpringBootApplication
public class Producer implements CommandLineRunner {

    @Autowired
    private RabbitTemplate rabbitTemplate;

    @Bean
    public FanoutExchange fanoutExchange() {
        return new FanoutExchange("fanout-exchange");
    }

    public static void main(String[] args) {
        SpringApplication.run(Producer.class, args);
    }

    @Override
    public void run(String... args) throws Exception {
        String message = "Hello, RabbitMQ Fanout Exchange!";
        rabbitTemplate.convertAndSend("fanout-exchange", "", message);
        System.out.println("Sent: " + message);
    }
}
- 消费者 Consumer:
import org.springframework.amqp.rabbit.annotation.RabbitListener;
import org.springframework.boot.SpringApplication;
import org.springframework.boot.autoconfigure.SpringBootApplication;

@SpringBootApplication
public class Consumer {

    public static void main(String[] args) {
        SpringApplication.run(Consumer.class, args);
    }

    @RabbitListener(queues = "fanout-queue-1")
    public void receiveMessage1(String message) {
        System.out.println("Consumer 1 - Received: " + message);
    }

    @RabbitListener(queues = "fanout-queue-2")
    public void receiveMessage2(String message) {
        System.out.println("Consumer 2 - Received: " + message);
    }
}
在这个简单的示例中,生产者通过 rabbitTemplate 向名为 "fanout-exchange" 的 Fanout Exchange 发送消息。两个消费者分别监听名为 "fanout-queue-1" 和 "fanout-queue-2" 的队列,这两个队列都绑定到了 Fanout Exchange。
确保 RabbitMQ 已经正确安装和运行,运行生产者和消费者的 Spring Boot 应用程序后,生产者会发送消息到 Fanout Exchange,所有绑定该 Exchange 的队列都会接收到相同的消息并打印出来。
注意:以上示例代码使用了 Spring Boot 和 Spring AMQP(RabbitMQ 的 Java客户端),请确保项目中已经引入相关的依赖。
8、路由模式
以下是一个在 Spring Boot 项目中实现 RabbitMQ 简单的 Direct Exchange 模式的示例代码,包括生产者和消费者的实现:
- 添加依赖:
在 pom.xml 文件中添加以下依赖:
<dependencies>
    <!-- RabbitMQ 客户端依赖 -->
    <dependency>
        <groupId>org.springframework.boot</groupId>
        <artifactId>spring-boot-starter-amqp</artifactId>
    </dependency>
</dependencies>
- 配置 RabbitMQ 连接:
在 application.properties 文件中添加 RabbitMQ 的连接配置:
spring.rabbitmq.host=localhost
spring.rabbitmq.port=5672
spring.rabbitmq.username=guest
spring.rabbitmq.password=guest
- 生产者 Producer:
import org.springframework.amqp.core.Binding;
import org.springframework.amqp.core.BindingBuilder;
import org.springframework.amqp.core.DirectExchange;
import org.springframework.amqp.core.Queue;
import org.springframework.amqp.rabbit.core.RabbitTemplate;
import org.springframework.beans.factory.annotation.Autowired;
import org.springframework.boot.CommandLineRunner;
import org.springframework.boot.SpringApplication;
import org.springframework.boot.autoconfigure.SpringBootApplication;
import org.springframework.context.annotation.Bean;

@SpringBootApplication
public class Producer implements CommandLineRunner {

    @Autowired
    private RabbitTemplate rabbitTemplate;

    @Bean
    public DirectExchange directExchange() {
        return new DirectExchange("direct-exchange");
    }

    @Bean
    public Queue queue() {
        return new Queue("direct-queue");
    }

    @Bean
    public Binding binding(Queue queue, DirectExchange directExchange) {
        return BindingBuilder.bind(queue).to(directExchange).with("direct-routing-key");
    }

    public static void main(String[] args) {
        SpringApplication.run(Producer.class, args);
    }

    @Override
    public void run(String... args) throws Exception {
        String message = "Hello, RabbitMQ Direct Exchange!";
        rabbitTemplate.convertAndSend("direct-exchange", "direct-routing-key", message);
        System.out.println("Sent: " + message);
    }
}
- 消费者 Consumer:
import org.springframework.amqp.rabbit.annotation.RabbitListener;
import org.springframework.boot.SpringApplication;
import org.springframework.boot.autoconfigure.SpringBootApplication;

@SpringBootApplication
public class Consumer {

    public static void main(String[] args) {
        SpringApplication.run(Consumer.class, args);
    }

    @RabbitListener(queues = "direct-queue")
    public void receiveMessage(String message) {
        System.out.println("Received: " + message);
    }
}
在这个简单的示例中,生产者通过 rabbitTemplate 向名为 "direct-exchange" 的 Direct Exchange 发送消息,并指定了 routing key 为 "direct-routing-key"。消费者监听名为 "direct-queue" 的队列,该队列与 Direct Exchange 绑定,并且指定了匹配的 routing key。
确保 RabbitMQ 已经正确安装和运行,运行生产者和消费者的 Spring Boot 应用程序后,生产者会发送消息到 Direct Exchange,只有绑定了相同 routing key 的队列会接收到消息并打印出来。
注意:以上示例代码使用了 Spring Boot 和 Spring AMQP(RabbitMQ 的 Java客户端),请确保项目中已经引入相关的依赖。
9、主题模式
以下是一个在 Spring Boot 项目中实现 RabbitMQ 简单的 Topic Exchange 模式的示例代码,包括生产者和消费者的实现:
- 添加依赖:
在 pom.xml 文件中添加以下依赖:
<dependencies>
    <!-- RabbitMQ 客户端依赖 -->
    <dependency>
        <groupId>org.springframework.boot</groupId>
        <artifactId>spring-boot-starter-amqp</artifactId>
    </dependency>
</dependencies>
- 配置 RabbitMQ 连接:
在 application.properties 文件中添加 RabbitMQ 的连接配置:
spring.rabbitmq.host=localhost
spring.rabbitmq.port=5672
spring.rabbitmq.username=guest
spring.rabbitmq.password=guest
- 生产者 Producer:
import org.springframework.amqp.core.Binding;
import org.springframework.amqp.core.BindingBuilder;
import org.springframework.amqp.core.TopicExchange;
import org.springframework.amqp.core.Queue;
import org.springframework.amqp.rabbit.core.RabbitTemplate;
import org.springframework.beans.factory.annotation.Autowired;
import org.springframework.boot.CommandLineRunner;
import org.springframework.boot.SpringApplication;
import org.springframework.boot.autoconfigure.SpringBootApplication;
import org.springframework.context.annotation.Bean;

@SpringBootApplication
public class Producer implements CommandLineRunner {

    @Autowired
    private RabbitTemplate rabbitTemplate;

    @Bean
    public TopicExchange topicExchange() {
        return new TopicExchange("topic-exchange");
    }

    @Bean
    public Queue queue1() {
        return new Queue("topic-queue-1");
    }

    @Bean
    public Queue queue2() {
        return new Queue("topic-queue-2");
    }

    @Bean
    public Binding binding1(Queue queue1, TopicExchange topicExchange) {
        return BindingBuilder.bind(queue1).to(topicExchange).with("topic.key1");
    }

    @Bean
    public Binding binding2(Queue queue2, TopicExchange topicExchange) {
        return BindingBuilder.bind(queue2).to(topicExchange).with("topic.#");
    }

    public static void main(String[] args) {
        SpringApplication.run(Producer.class, args);
    }

    @Override
    public void run(String... args) throws Exception {
        String message1 = "Hello, RabbitMQ Topic Exchange - Key1!";
        rabbitTemplate.convertAndSend("topic-exchange", "topic.key1", message1);
        System.out.println("Sent: " + message1);

        String message2 = "Hello, RabbitMQ Topic Exchange - Key2!";
        rabbitTemplate.convertAndSend("topic-exchange", "topic.key2", message2);
        System.out.println("Sent: " + message2);
    }
}
- 消费者 Consumer:
import org.springframework.amqp.rabbit.annotation.RabbitListener;
import org.springframework.boot.SpringApplication;
import org.springframework.boot.autoconfigure.SpringBootApplication;

@SpringBootApplication
public class Consumer {

    public static void main(String[] args) {
        SpringApplication.run(Consumer.class, args);
    }

    @RabbitListener(queues = "topic-queue-1")
    public void receiveMessage1(String message) {
        System.out.println("Consumer 1 - Received: " + message);
    }

    @RabbitListener(queues = "topic-queue-2")
    public void receiveMessage2(String message) {
        System.out.println("Consumer 2 - Received: " + message);
    }
}
在这个示例中,生产者通过 rabbitTemplate 向名为 "topic-exchange" 的 Topic Exchange 发送消息,并指定了不同的 routing key。消费者分别监听了两个队列 "topic-queue-1" 和 "topic-queue-2",这两个队列都与 Topic Exchange 绑定,并且指定了匹配的 routing key。
确保 RabbitMQ 已经正确安装和运行,运行生产者和消费者的 Spring Boot 应用程序后,生产者会发送不同的消息到 Topic Exchange,根据 routing key 的匹配规则,相应的队列会接收到消息并打印出来。
注意:以上示例代码使用了 Spring Boot 和 Spring AMQP(RabbitMQ 的 Java 客户端),请确保项目中已经引入相关的依赖。